Skip to content
Balancing and aligning your tonearm is one of the most vital steps in setting up your new turntable. Whether you’re mixing vinyl or just listening at home, proper tonearm adjustment protects your records, keeps your stylus healthy, and gives you cleaner, more consistent audio.
Below is a practical, easy-to-follow guide built around the essentials to balance and align the tonearm.
Why It Matters To Balance And Align The Tonearm
Your tonearm does much more than just hold the cartridge. It determines how the stylus sits in the groove, how much pressure it applies, and how well it tracks the record from start to finish.
When the tonearm isn’t balanced correctly:
- The stylus can skate across the record
- The sound becomes distorted or dull
- Your records wear out faster
- The needle may jump during loud or bass-heavy parts
Alignment adds another layer: the stylus must sit at the correct angle. Misalignment often shows up as distortion near the inner grooves, harsh high frequencies, or uneven wear on the needle.
Together, balancing and aligning your tonearm set the foundation for clean sound and long gear life.
Tools You Need
You don’t need a full toolbox to set up your tonearm properly. A few simple items are enough:
1. Tracking Force Gauge (optional but recommended)
Your counterweight scale is usually accurate, but a gauge gives you precise readings. Great for DJs who run heavier tracking forces.
2. Cartridge Alignment Protractor
The alignment protractor ensures your stylus sits at the correct angle throughout the record. You can print one at home or use an overhang gauge if your turntable includes it.
3. Anti-Skate Control
Built into almost all turntables. Make sure yours is set up correctly. It works alongside tracking force to keep the stylus centered.
Step-by-Step
1. Set Anti-Skate to Zero
Before balancing the tonearm, reduce the anti-skate to 0. Anti-skate only works properly once the correct tracking force is applied.
2. Float the Tonearm
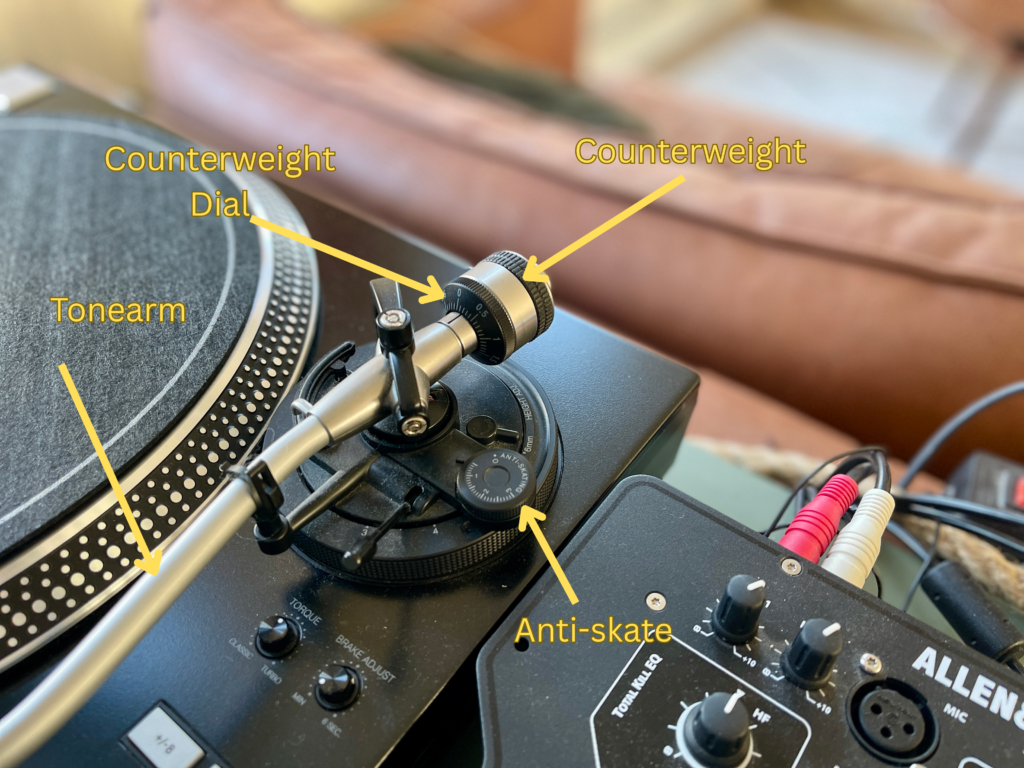
Unlock the tonearm and gently move it toward the platter. Rotate the counterweight until the arm floats horizontally and is perfectly balanced; not rising, not dipping. This floating point is your “zero.”
Make sure you do this while the cartridge is connected to the tonearm. Next, ensure you have a protective sleeve over your stylus so the needle does not get damaged.
3. Set the Dial to Zero
While keeping the counterweight in place, rotate only the numbered ring so it lines up with “0.” This ensures you mark your “zero” point.
4. Apply the Correct Tracking Force
Now rotate the entire counterweight (including the dial) to match the tracking force recommended for your cartridge.
Typical ranges:
- DJ spherical styli: 3–5 g
- Hi-fi elliptical styli: 2–3 g
It really depends on the cartridge you are using, so check this out separately for your specific cartridge.
5. Re-apply Anti-Skate
The value you use on your Anti-Skate really depends on how you use your turntable. If you are a DJ, you will probably be backscratching a lot (playing the record in the opposite direction). For that purpose, you want to put the anti-skate close to 0. That will minimise skipping of the record when backscratching.
If you are not a DJ and want to listen to your records, then setting the anti-skate to the same value as your tracking force is probably best for you. For example, if your recommended tracking force (or counterweight value) for your cartridge is 3 grams, you want to put the anti-skate to 3 as well.
6. Align the Cartridge
Now that the tonearm is balanced, it’s time to check alignment. Place your protractor on the platter and position the stylus on the first grid. The cartridge should sit parallel to the printed lines. Move to the second grid and repeat.
If both points match, your alignment is correct. If not, adjust the cartridge slightly forward, backward, or angled, and check again.
Common Mistakes
Running Too Much or Too Little Tracking Force
Too light, and the stylus bounces across the groove. Too heavy, and you wear out records and needles quickly. Stick to the manufacturer’s recommended range.
Skipping Alignment Completely
Many people balance the tonearm but forget alignment. This is the biggest reason for distortion near the end of a side.
Dirty Stylus or Dirty Records
Even a perfect setup won’t help if your stylus drags dust through the groove. Clean records allow for a steady and uninterrupted signal to the cartridge.
Not Rechecking After Adjustments
Each step affects the next. Small shifts can throw off alignment or tracking force, so it’s always worth resetting and checking everything once more at the end.